Easy Way to Put on a Duvet Cover by Yourself
Changing a duvet cover can feel like a big and annoying task. A Crane & Canopy survey showed almost 80% of people think it’s hard to get their comforter inside the duvet cover. But, putting on a duvet cover by yourself can be easy. There are simple ways to do it, like the Burrito method. This method is quick and beginners can learn it fast.
The Burrito method is a DIY way that is efficient and easy. It’s not like the usual ways, making changing your duvet cover much easier. It takes less than five minutes. It helps with alignment issues or when your comforter bunches up. So, if you’re finding it hard, this method could be what you need.
A guide on the quick duvet cover method has easy steps. First, lay your duvet flat. Then, turn the cover inside out. Next, roll and tuck the cover around the comforter. Even if the pictures in the guide aren’t professional, they’re clear enough to help. You can use ties or something like safety pins to keep the cover in place. This makes sure your cover fits well every time.
For tips on keeping your bedding clean, check out this guide on washing IKEA mattress covers.
The Burrito Method Explained
The burrito method for duvet covers makes changing a duvet cover by yourself easy. Over 325,101 readers have found our guide helpful. It shows a step-by-step way to ensure your duvet fits perfectly inside its cover without hassle.
Step-by-Step Guide
- Preparation: Lay your duvet cover inside-out on your bed with the opening at the foot. Place your duvet insert on top, ensuring it aligns neatly.
- Roll: Starting from the head of the bed, begin rolling the duvet and cover together, similar to rolling a burrito.
- Secure: Fasten the duvet and cover together using ties, buttons, or safety pins if necessary.
- Flip: Once you’ve reached the end, invert the cover over the bundled duvet by pulling it over the roll.
- Unroll: Smoothly unroll the cover and insert combination across your bed.
- Adjust: Button or zip up the duvet cover to complete the process.
This method makes sure your duvet stays in place inside the cover. It prevents the duvet from moving around or bunching up.
Why It’s Effective
The burrito method is a game-changer for many reasons. It keeps your duvet and cover tight together. Turning the cover right side out around the duvet is made simple, avoiding any tricky movements. This prevents the duvet from bunching up inside.
Using ties or buttons ensures everything stays in place for a neat finish. This method gives you a straightforward way to change your duvet cover alone. It turns a tough job into something simple and quick.
| Method | Preparation Steps | Action Steps | Completion |
|---|---|---|---|
| Burrito Method | 1. Lay duvet cover inside-out 2. Position duvet on top | 3. Roll duvet and cover together 4. Invert cover over roll | 5. Unroll smoothly 6. Button up the cover |
| Traditional Method | 1. Lay duvet flat 2. Turn cover inside-out | 3. Align corners 4. Flip cover over the duvet | 5. Shake out cover 6. Button or zip up |
Materials Needed for Putting on a Duvet Cover Solo
Putting on a duvet cover by yourself might seem hard. But it gets easy with the right stuff and some tips. Knowing what you need and how to use it makes all the difference.
List of Tools and Accessories
- Duvet cover (preferably inside-out)
- Duvet or comforter
- Flat bed surface
- Optional: Duvet clips or snaps for securing corners
To install a duvet cover alone, start with your cover turned inside-out. You’ll also need your duvet or comforter and a flat bed. Duvet clips or snaps are great for keeping everything in place.
Optional Add-ons
Some extra items can make changing a duvet cover even easier:
- Corner ties: These help keep the insert in place.
- Corner clips: They provide a tight fit and stop the duvet from moving.
- Fabric freshener: A quick spray keeps your duvet smelling nice.
Using these tips for putting on a duvet cover alone can help a lot. The goal is to keep everything straight to avoid any hassle.
For more help, look into techniques like the Burrito, Clothespin, and Inside-Out methods. For step-by-step instructions, click here.
Preparing Your Duvet and Cover
Getting your duvet and cover ready involves some easy steps. Clean bedding is key. It makes the setup nicer and keeps your bedding lasting longer. Here’s how to put on a duvet cover by yourself.
Cleaning and Laying Flat
- Start with freshly laundered duvet and cover.
- Lay the duvet flat on your bed to create an unencumbered workspace.
- Smooth out any wrinkles before proceeding to ensure a simple way to put on a duvet cover.
Turning the Duvet Cover Inside Out
Turning the cover inside out is a key tip. It makes the process efficient and aligning the corners easy:
- Turn the duvet cover inside out completely. This step is vital for both the California Roll and traditional methods.
- Align all four corners of your duvet cover with the comforter.
- Secure with ties if available, ensuring minimal shifting during use.
| Method | Time Saved | Difficulty Level |
|---|---|---|
| California Roll | Two minutes or less | Easy |
| Traditional Method | Similar to California Roll | Moderate |
By following these steps, putting on a duvet cover by yourself becomes easy. Learn how to do it without help, for a smooth setup every time.
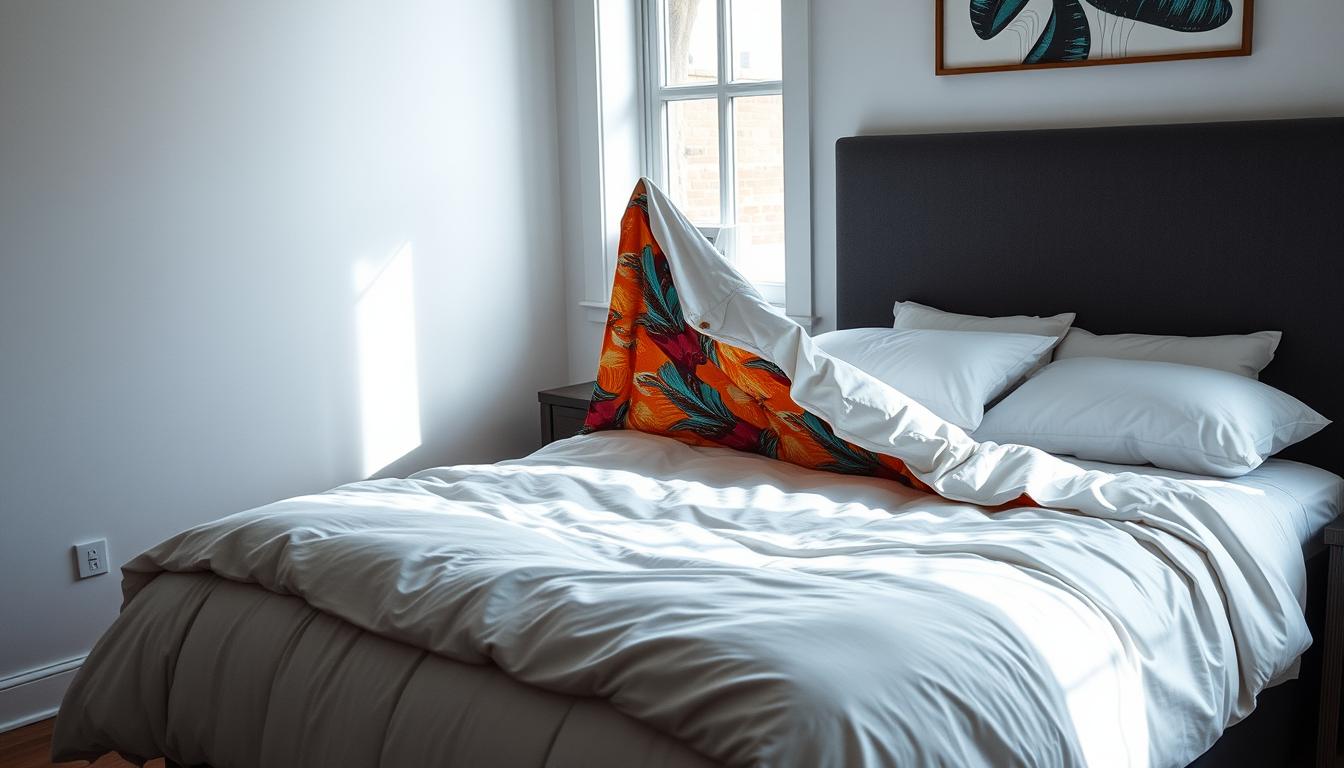
How to Put on a Duvet Cover by Yourself
Learning a quick method to put on a duvet cover alone can change the game. Start with turning your duvet cover inside out and laying it flat on your bed. Then, place your duvet on top of the cover. This easy DIY method hinges on aligning everything just right and securing it to look perfect.
First, make sure the duvet and cover corners meet up. This technique means putting each duvet corner into the matching corner of the inside-out cover. If your cover has ties or buttons, fasten them to keep the corners from moving. This step is key to keep everything in place as you finish up.
Begin at the bed’s head and roll the duvet and cover like a tight burrito. When you get to the end, flip the cover right side out. Unroll it down the length of the duvet to let it unfold over the comforter. To get the best fit, the duvet cover should be slightly bigger than the comforter. Just 1 to 2 inches larger can help it look and feel smoother. If there are no fasteners on your cover, use safety pins at the corners. With a helpful duvet cover tutorial, what frustrates 80% of people becomes much easier.
Steps to Rolling the Duvet Cover
Getting good at the duvet cover solo technique is key for anyone wanting an easier bedding routine. The California Roll Way, inspired by making sushi, provides an efficient way to tackle this issue. It’s important to make sure your duvet and cover corners line up before starting.
Aligning the Corners
Getting the corners right is vital when putting on a duvet cover by yourself. First, spread your duvet out, checking it’s clean and smooth. Then, turn your duvet cover inside out. Reach in to grab the top two corners. Now, grab the duvet’s corners and match them with the cover’s, tying them together if you can. This makes sure your duvet won’t move around inside the cover, making the next steps easier.
Rolling From the Headboard
With the corners matched up, start rolling from the headboard side. Roll the duvet and cover together towards the bed’s end. It’s like rolling a burrito, where the tighter the roll, the better. This single-handed duvet cover method turns a hard job into an easy task, even when you’re doing it alone.
| Method | Preferred by (%) | Advantages |
|---|---|---|
| California Roll | 65% | Simplifies rolling process |
| Traditional | 35% | Straightforward stuffing technique |
| Nova | N/A | Eliminates need for button closures |
This step-by-step method for applying a duvet cover makes a usually frustrating task much simpler. By learning this solo technique, changing your bedding becomes easy and stress-free.
Pulling the Down Comforter Through
The ‘burrito method’ has a key step to get your down comforter snug in its duvet cover. According to a survey by Crane & Canopy, almost 80% of people struggle to do this. We’ll show you how to install your duvet cover easily.
Using Your Hands Effectively
After rolling your duvet and cover like we described in our self-installation tutorial, reach inside the roll next. Grab the down comforter’s corners from inside the cover. This is like pulling a pillow out of its case, but backwards. Holding the corners tightly ensures a snug and independent duvet cover fitting.
Turning the Duvet Cover Right-Side Out
Keep the corners in your hands and gently pull through. This flips the cover right-side out around the comforter. It’s a slick trick used in luxury hotels for a seamless duvet setup. By doing this, you avoid any twists, ensuring a perfect duvet fit.
Mastering these steps makes changing your duvet easy and fun. It’s not just practical— it makes your bed look and feel great. A well-fitted duvet cover keeps your bedroom cozy and stylish.
Smoothing and Fluffing the Duvet
Making your bed perfectly requires more than an easy duvet cover method. After putting on the cover easily, you should smooth and fluff the duvet. These steps make sure your duvet looks perfect.
Why Tying the Corners is Important
Securing the duvet cover’s corners is a top hack. It keeps the duvet in place for better shaking and fluffing. Without these ties, the duvet can move out of place, making efforts pointless. The Company Store has duvet inserts with loops, and their covers have corner ties for easy use.
Techniques to Remove Wrinkles
Removing wrinkles is important for an easy duvet cover process. Here are effective ways to keep your duvet smooth:
- Shaking and Fluffing: After tying the corners, shake the duvet well to even out the filling.
- Using a Wrinkle Remover Spray: For hard wrinkles, use a wrinkle remover spray. Spray lightly and smooth out the fabric by hand.
- Steam Ironing: For deep wrinkles, steam ironing may be needed. But check the care label first to prevent damage.
- Manual Smoothing: Lastly, smooth out any remaining wrinkles with your hands over the duvet cover’s surface.
Applying these steps when putting on your duvet cover not only tackles wrinkles. It also makes your bed look professionally done every time.
In the end, these duvet cover tips give a smooth, stylish finish. They turn your bed into a cozy and attractive place.
Styling Your Bed After Changing the Duvet Cover
After you finish putting on your solo duvet cover, it’s time to start styling your bed. This adds beauty and comfort to your room. Use neat folds and tuck in the edges for a tidy look. Thoughtfully placed pillows will also enhance your bed’s charm.
Adding decorative elements like throw pillows makes your bed look better. These duvet cover styling tips help create a lovely space. Here’s a table with some ideas:
| Item | Function | Styling Tip |
|---|---|---|
| Duvet Covers | Protective and decorative covering | Choose patterns or neutral tones complementing room decor. Price range: $45 to $298 |
| Duvet Inserts | Insulation and comfort | Opt for down or synthetic, depending on preference. Price range: $52 to $323 |
| Throw Pillows | Decorative, adds texture | Select various sizes and patterns; odd numbers look best |
| Comforters | Additional warmth and fluff | Layer with duvet for added comfort. Most expensive option: Warm Down Comforter at $149 |
Use these duvet cover styling tips and make your bed correctly every time. After changing your solo duvet cover, these steps make your bedroom welcoming and tidy.
Additional Tips for Duvet Cover Changes
Learning to change duvet covers with methods like the solo duvet cover approach makes a tough job easier. Many people find changing duvets hard. They often mix up the short and long sides.
Choosing a duvet cover that’s a bit larger than your duvet can give your bed a plush look. Using duvet clips keeps everything in place, stopping the duvet from moving around.
A flat sheet between you and the duvet cover can keep the duvet clean longer. This means less washing, which is easier to manage.
Using the solo duvet cover method is great if you’re on your own. It cuts down on the time this task usually takes.
The burrito method is a hit, thanks to videos showing how to change covers easier. This method is catching on because it saves time.
Some people sew ribbons or shoelaces to their duvet and cover to tie them together. Or, they use Velcro spots instead of sewing.
These solo duvet cover tricks will simplify changing your linens. You’ll spend less time, make your bed look better, and keep things cleaner without much effort.
Common Mistakes to Avoid When Changing a Duvet Cover Alone
Switching a duvet cover by yourself comes with its challenges. One common mistake is not tying the duvet corners. It’s important because it stops the insert from moving around. Messing this up can lead to a lot of extra work.
Also, not clearing your space before you start can cause problems. Things on the bed can snag the fabric, making it tough to get things right. Make sure you tidy up first. Getting the size wrong between your duvet and its cover is another issue. If they don’t match, it will look and feel wrong.
But, don’t worry, these errors are easy to dodge if you’re careful. For help, look at advice from those who have done it before on Hacker News. Also, check out these tips for changing a duvet cover on your own. By steering clear of these common errors, changing your duvet cover can be a breeze. Your bedding will always look great and be comfy.

Hey there, I’m Alex Hanson and I’m passionate about all things covers! Whether you’re looking for a car seat cover to protect your vehicle or an oven cover to keep your kitchen clean, I’m here to help. With years of experience in the industry, I have plenty of knowledge and insights to share with my readers. So, if you care about protecting your belongings and making them look their best, you’re encouraged to read my blog as I explore the perfect cover for every need.